Recipe Creator Tutorial
Learn how to use the new recipe creator to make and share your own visual recipes!
Click here to download the recipe creator tutorial as a PDF file.
Video Tutorial
Creating a User Profile
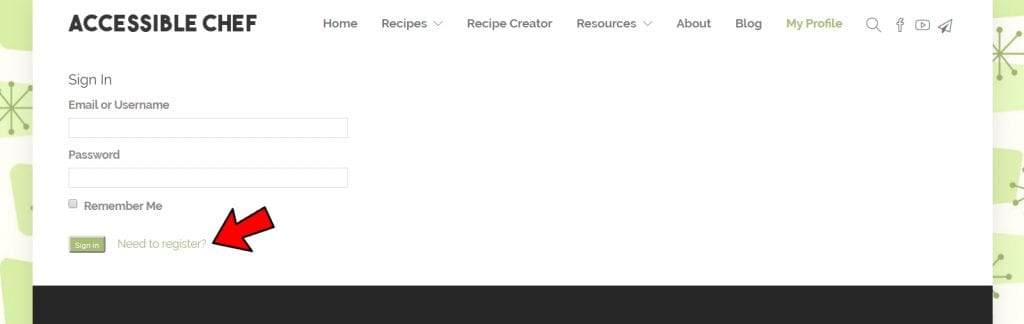
If you’d like to share your custom recipes on the Accessible Chef website and keep track of your favorite recipes, you can create a profile by navigating to the “My Profile” page. Click “Need to register?” and fill out the forms with your choice of username, email address, and password.

After clicking “register,” you will be taken to your new profile page, where you can find your custom recipes and edit your profile.

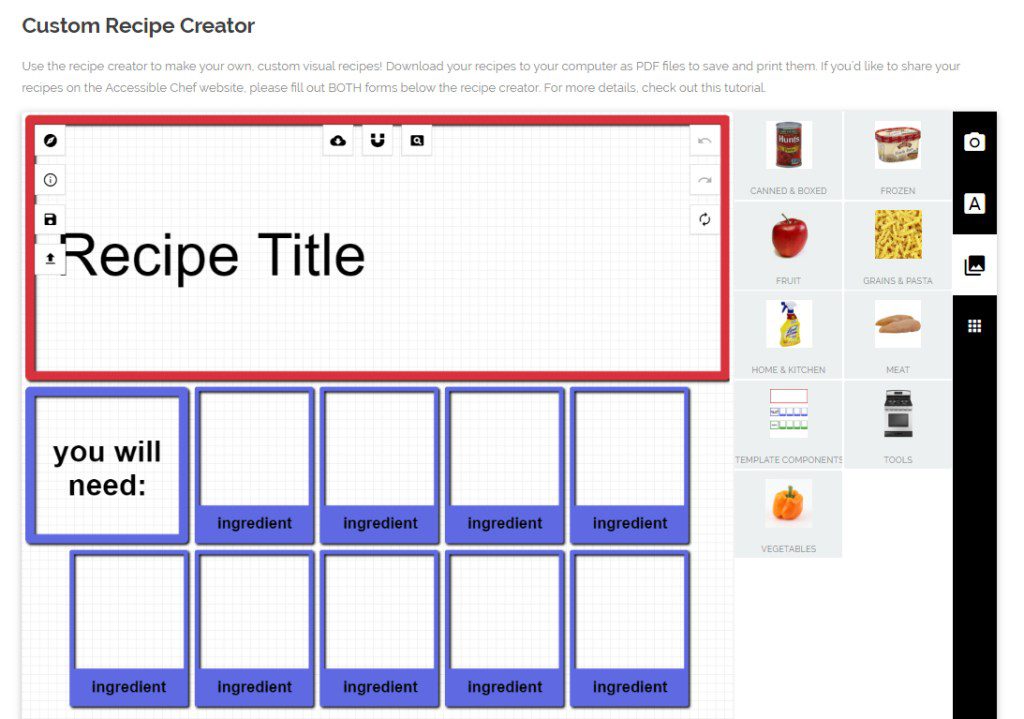
Starting a new recipe
When starting a new recipe, the first step is to select a recipe template that is close in length to your recipe. Click the icon on the right with nine squares, which is labeled “Swap recipe template type.”

Click one of the recipe templates to load the template into the recipe creator. Note that selecting a recipe template will revert the recipe to a blank template, erasing any custom icons or text that you have added to the recipe. The three templates differ only in the number of boxes available:
- Standard: 9 ingredients, 9 tools, and 7 rows of steps
- Long: 19 ingredients, 24 tools, and 15 rows of steps
- Short: 4 ingredients, 4 tools, and 3 rows of steps
Adding Recipe Title and Feature Image
To add a recipe title, double click the “Recipe Title” text to select it and type in your custom recipe title.

To upload a custom image, click the camera icon then the button “click or drop images here.” Select the image you want to upload, then click and drag the image to the correct location. You can use the buttons around the image to duplicate, rotate, scale, trash, align, and mirror the image. You can also use the “move up” and “move down” buttons to move the image above or below other elements in the recipe.


Adding Ingredients and Tools
Many ingredient and tool images are already loaded into the recipe creator. To access these images, click the image button labeled “choose from available images” then the relevant category of images. You can search for images using the search bar at the top of the module or you can scroll through all available images. Click an image once to add it to the recipe, then use the image tools to move and scale the image.

If you can’t find an image that you need, use the upload image tool to add a custom image.
To edit the text below an ingredient or tool, double click the text to select and replace with your own text.

To remove extra boxes and text, select the box or text then click the trash icon to remove it. If you ever need to add recipe, tool, or step boxes, you can find them in the “template components” category of images.
Adding Recipe Instructions
After completing the ingredients and tools sections, you will need to add recipe instructions and instruction images. To move to the next page of the recipe, scroll down and click the page thumbnails below the recipe creator.

To add a recipe instruction, follow the steps described for ingredients and tools (above). You can upload your own images or use common cooking images from the “actions” category.

To remove extra boxes and text, select the extra element and click the trash icon to delete. If you ever can’t see the trash icon, you may need to drag the element closer to the center of the recipe page before deleting.

Advanced Editing
Adding Custom Text
To add a custom text box, click the “A” icon and enter text in the text box. Using the custom text option will allow you to control the size and shape of the text or to add text to a part of the recipe that does not have text by default.

Adding and Removing Recipe Pages
Sometimes you may want to remove extra pages of the recipe or to add new pages to the recipe. Navigate to the “manage views” module, where each page of the recipe is represented by a thumbnail. To remove a page, click the “x” button on the lower right-hand corner of the thumbnail. To add a blank page, click the “blank” button at the top of the module and add a page with the dimensions of 847 x 1111 mm. To duplicate a page, click the “copy” button on the lower left-hand corner of the thumbnail. To rearrange the order of pages, click and drag pages up or down. The top thumbnail represents the first page of the recipe.

Saving and Loading Recipes
If you would like to be able to edit a recipe later, save the recipe to your profile by clicking the “save” button on the left-hand side of the recipe creator. Choose a unique name for your recipe and click “save.” The recipe will now appear on your profile page.
Note: Saving more than ~3 recipes may cause the recipe creator to load slowly or freeze. Be sure to delete unneeded drafts as you save new versions.

To load a recipe into the recipe creator, first click the “load” button on the left-hand side of the recipe creator, then select the recipe that you’d like to load from the right-hand panel.

You can also load recipes into the recipe creator by navigating to your profile and clicking the recipe that you would like to edit.

Saving Recipes to Your Computer
To download a recipe to your computer, click the “download” button at the top of the recipe creator. Checking the box marked “Only export current showing view” will save only the page that is currently visible in the recipe creator. In most cases, you will want to save the recipe to your computer as a PDF file. It may take a few seconds for the recipe to download to your computer.

If the images in your recipe have gray outlines around them, you can try saving the recipe to your computer by clicking the “print” button at the top of the recipe and choosing “Save as PDF.” You may need to adjust the scale (to about 30%) to print on letter-size paper.

Sharing a Recipe with the Accessible Chef Community
If you’d like to post your visual recipe on the Accessible Chef website, fill out the form below the recipe creator and click the “Submit Recipe” button. You should submit the recipe last, after you have saved it to your account in the recipe creator and saved it to your computer as a PDF.

If you’d like to use the old recipe creator instead, you can still find it here.
If you have questions, comments, or concerns about the recipe creator, please email me at anna.moyer@gmail.com.
Related items

Image Bank
