Guest Post: Seven DIY Kitchen Hacks
Today we have a special guest blog post from Maria Lindbergh, an occupational therapist who specializes in home adaptations. Be sure to check out her blog, Stay at Home Solutions, for more amazing content about home and kitchen modifications for people with disabilities.
Do you love cooking in the kitchen? Are there some annoying problems that bug you, like trouble opening can tabs or feeling tired while you work? Maybe you find yourself struggling to twist off jar lids or carry ingredients across the room.
You’re not alone! There are easy, inexpensive ways to make your kitchen time more enjoyable and easier to do.
We’re going to share do-it-yourself kitchen hacks to make cooking even better! You can find many of these items in your home, the dollar store, or the drug store. Spend little to no money whatsoever on these projects!
Problem: Your bowl is slip-sliding all over the counter while you’re trying to stir.
Solution: Put a non-slip placemat or non-slip shelf liner under the bowl to hold it into place. The resistance from the placemat and shelf liner keeps the bowl from moving everywhere. You can also do this for plates, cutting boards, or trays. Whatever you want!
Take a look at your kitchen table to see if you already have a non-slip placemat. You can use it for eating and stirring! Open the kitchen cabinets to see if there’s an extra piece of unused non-slip shelf liner. (That’s how I found mine in the picture!)
Fan of the dollar store? You know I am! Buy a roll of non-slip shelf liner or a non-slip placemat in any color or style to match your kitchen aesthetic.

Problem: It’s hard to hold onto the kitchen utensil handle, like ladles or spatulas. Sometimes the utensil drops to the floor . . .
Solution: There are several ways to make handles easier to hold! Foam grip tubing has a hole in the middle for you to slide onto the handle. The foam builds up the handle and makes it thicker so it’s easier to grip.
Foam grip tubing comes in different hole sizes for you to find the perfect fit for your kitchen utensils. Cut the length of the tubing as long or short as you like. You want the foam to fit snugly onto the handle, not too tight and not too loose!
Sadly, you may not find foam grip tubing at the dollar store. If you do online shopping, you can easily find a variety of foam grip tubing on Amazon or rehab equipment web sites.
Another DIY hack you can use is the foam off of hair curlers (Please WASH before use!). Just rip those suckers off the hard plastic part and put it on your kitchen utensil handle. Voila! The handle is so much easier to hold!
If the foam hair curlers belong to a family member, make sure to ask their permission before dismantling their beauty products! Check linen closets and bathroom cabinets to see if there’s any unused hair curlers laying around.
Lastly, coban self-adherent wrap is excellent for making kitchen utensil handles easier to grip because it feels a bit tacky. Cut off enough coban from the roll to overlap and stick to itself around the handle. A little goes a long way, my friends!
Check your first aid kit for coban or visit the dollar store or drug store. A roll of coban costs around $3.00. The cost of not dropping your spoon on the floor while cooking? Priceless.


Problem: Trouble twisting the lid off of jars.
Solutions: Once again, coban comes to the rescue! Place a piece of coban on top of the lid, grip, and twist to open or close. You’ll notice how effortless this feels!
Another option is using a cut up tennis ball. You could probably find one in the backyard that’s totally shredded by the lawn mower. Gotta love free tennis balls! I usually find abandoned tennis balls by tennis courts.
Turn the tennis ball into a lid opener by using a box cutter and scissors to cut it in half. Cutting up the tennis ball takes a lot of patience and grip strength, so please ask for help if you need it! Teamwork makes the dream work!
Now you can cup the tennis ball in your palm and place the tacky inside against the lid. Grip and twist to open that jar!


Problem: All you want to do is to eat soup, but you’re having difficulty opening the tab on the can.
Solution: Don’t buy a fancy tab opener! That’s just extra clutter sitting in the drawer. Use what you’ve got and stroll on over to your toolbox to get a flathead screwdriver. Place the flathead under the tab and push down on the handle to open it.
Easy peasy!

Problem: It’s hard carrying multiple ingredients in the kitchen.
Solution: Load up a serving tray or cookie sheet with what you need and carry it around your kitchen. You could also use a serving tray or cookie sheet for meal prep, like stirring or combining ingredients.
You may already own a cookie sheet or a serving tray at home. If not, check out the dollar store, thrift stores, or call friends and family members to see if they have extra cookie sheets or serving trays they’re not using.
Another idea is to use a kitchen trolley. Pushing a kitchen trolley is definitely the easiest way to “carry” what you need! You can roll the kitchen trolley around to get what you need for cooking, store kitchen supplies, and use the top surface area, storage for meal prep.
Kitchen trolleys can definitely get pricey! To avoid breaking the bank, I’d recommend looking at thrift stores or calling friends and family members for unused trolleys. You never know what you’ll find!
Problem: You tire easily after standing too long.
Solution: One of my favorite DIY hacks is opening a drawer, placing a cutting board or tray on top, and sitting down. That way, you’re not too far away from things you might need in the kitchen.
You can also sit down at the table to cut, peel, stir, or do whatever you need to do. You’re not a kitchen wretch! Rest as needed, friend!

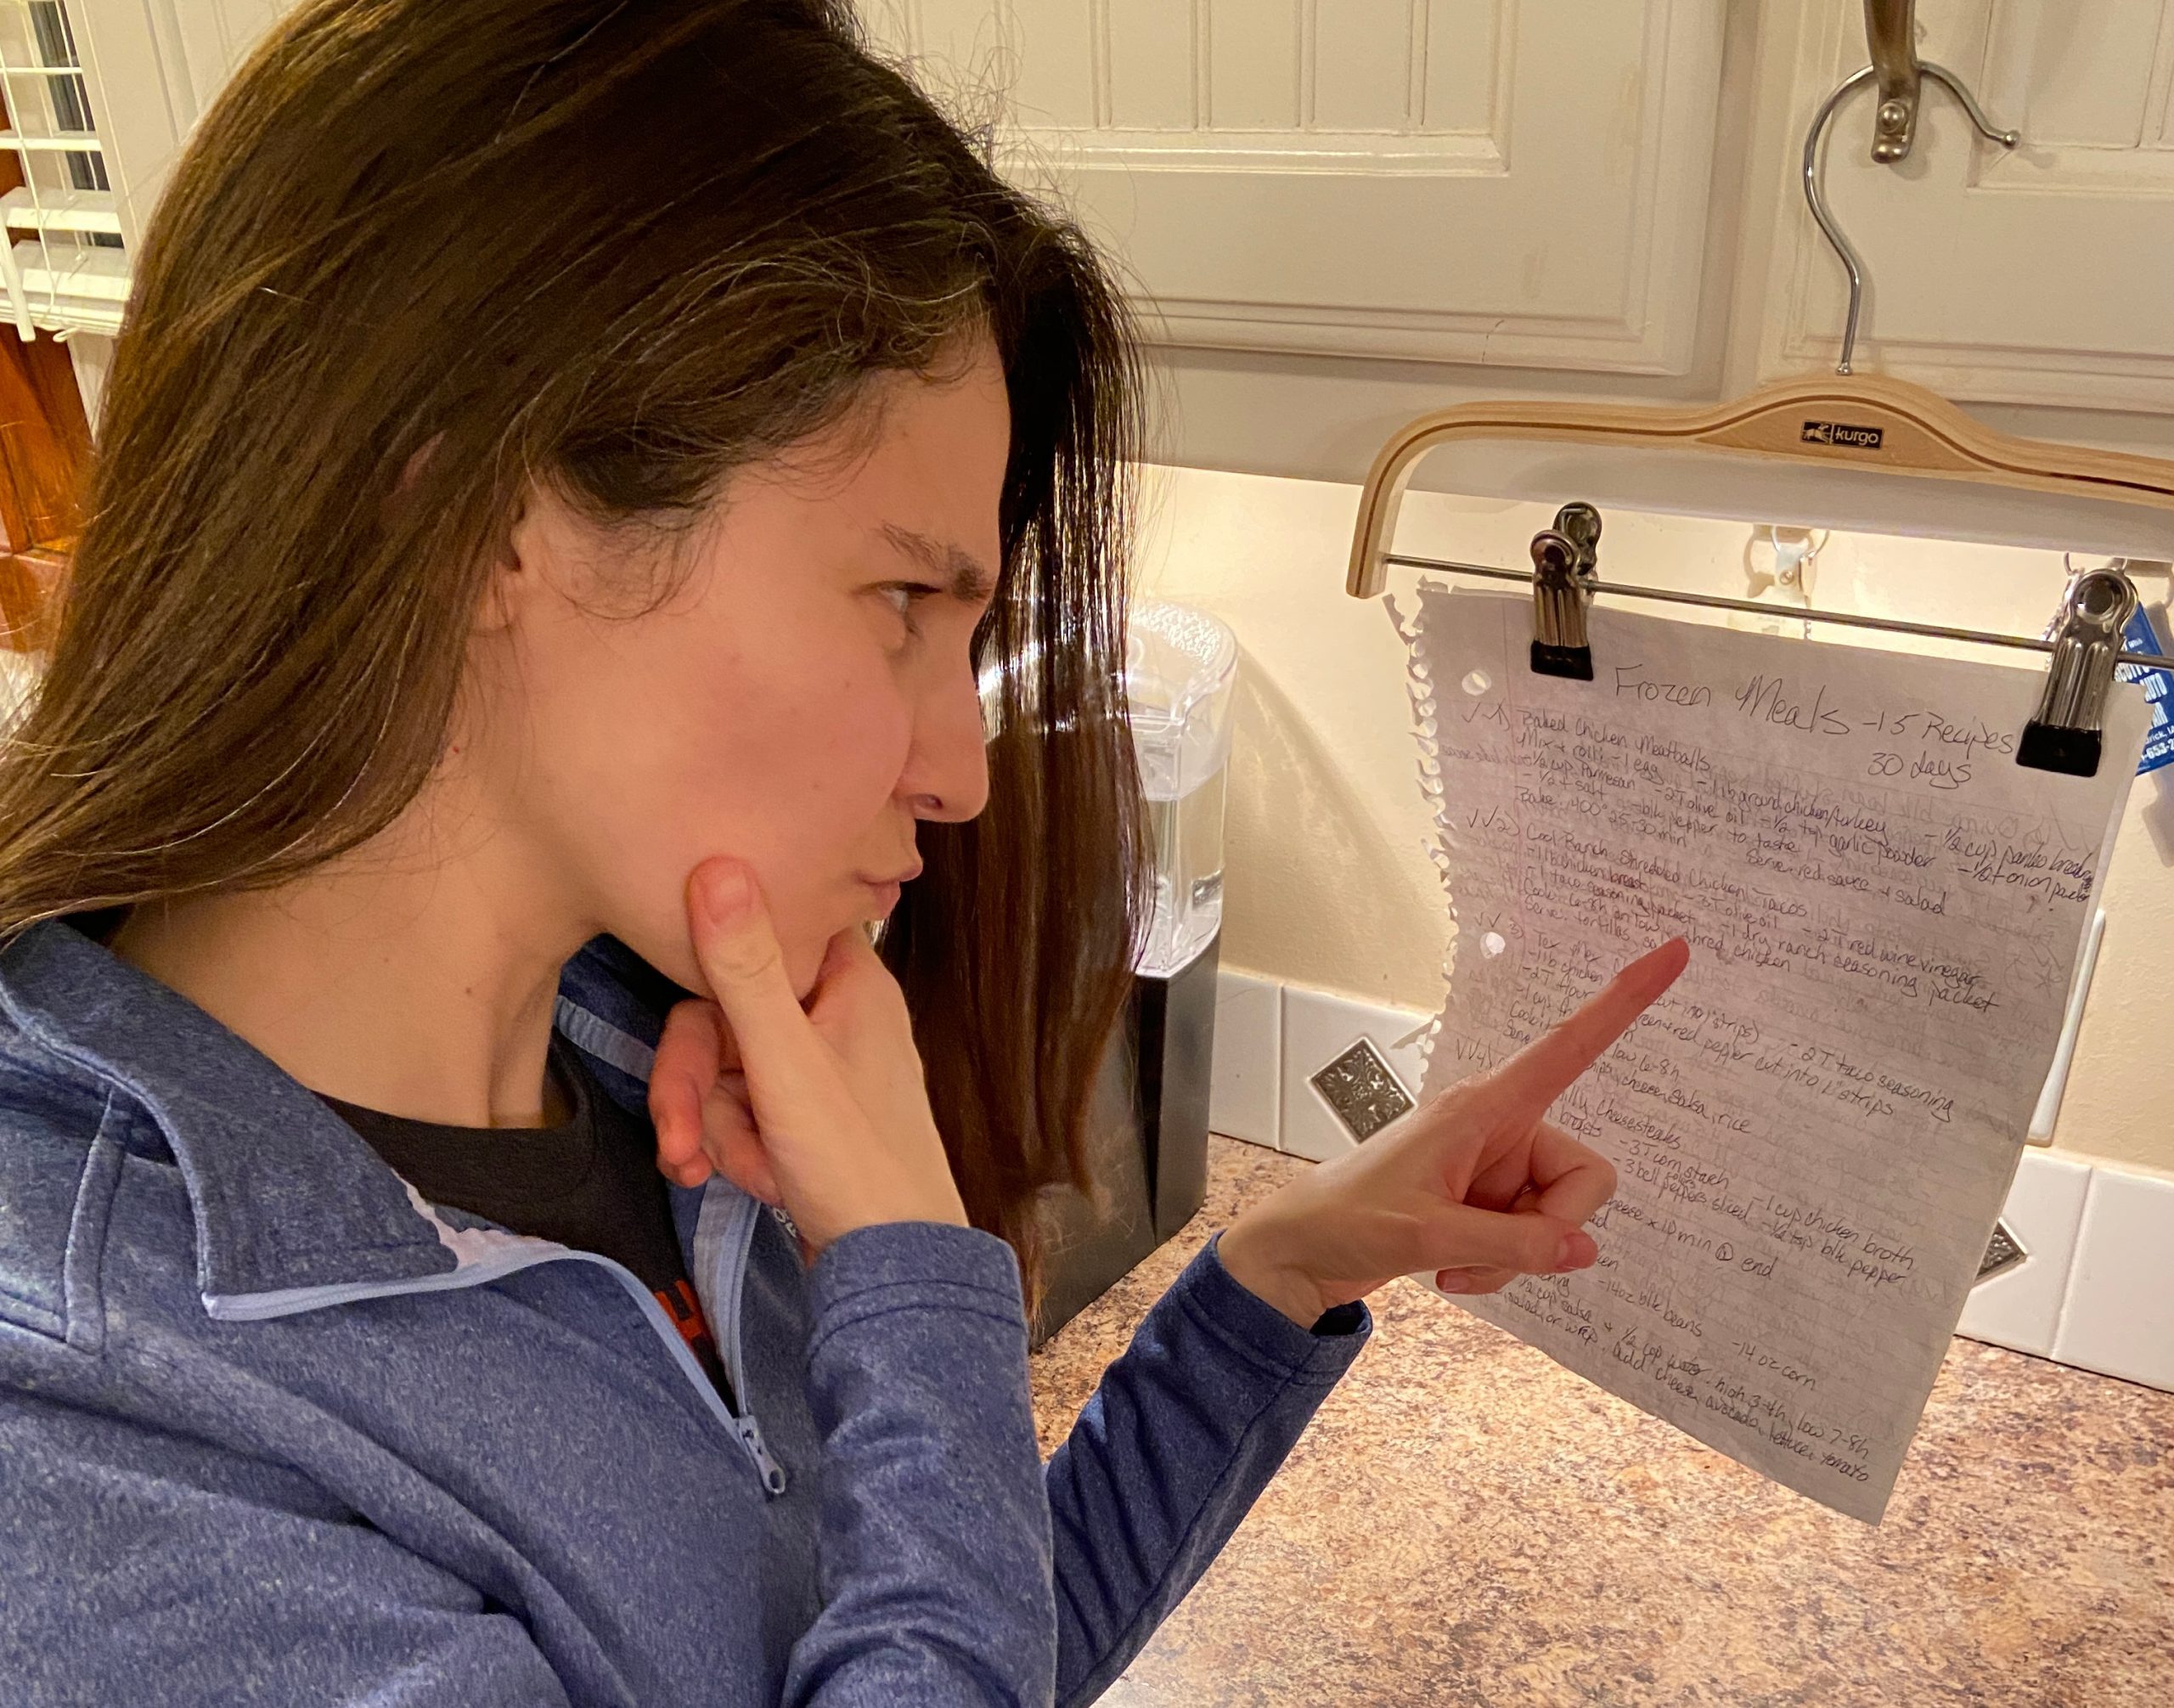
Problem: It’s hard to read the recipe when it’s laying on the countertop.
Solution: Take a pants hanger and use the clips to secure the recipe. Then take the hanger and put it on the handle of an upper kitchen cabinet.
The recipe is so much easier to read while it’s hanging at your eye level! Plus, there’s less chance of it getting wet or food crusted all over it. You’re keeping the recipe high and dry!

I hope these DIY kitchen hacks help make your time cooking easy and fun! Try these DIY kitchen hacks and come back to let us know how it went! Did you make your own DIY kitchen hacks? Share your tips in the comments. You may help somebody else out!
Maria Lindbergh, MOT, ECHM, OTR/L is an occupational therapist who has helped hundreds of older adults in their living space, nursing homes, and hospitals across the greater Kansas City area. Maria treasures her time as a caregiver for her grandparents before their passing in 2016 and 2019. This experience inspired her to create Stay at Home Solutions, a resource for caregivers to learn the best changes to make at home for their family members to live safely and independently. To learn more, visit her website at stayathomesolutionskc.com or email her at maria@stayathomesolutionskc.com.


